You can customize and tailor all our products to suit your own unique needs at absolutely no cost and no risk. Adding your own information on text boxes, to populate the corresponding text sections on invitations, event products and/or gifts, is pretty straight forward. This process allows you to create a very unique personal product for a great price!
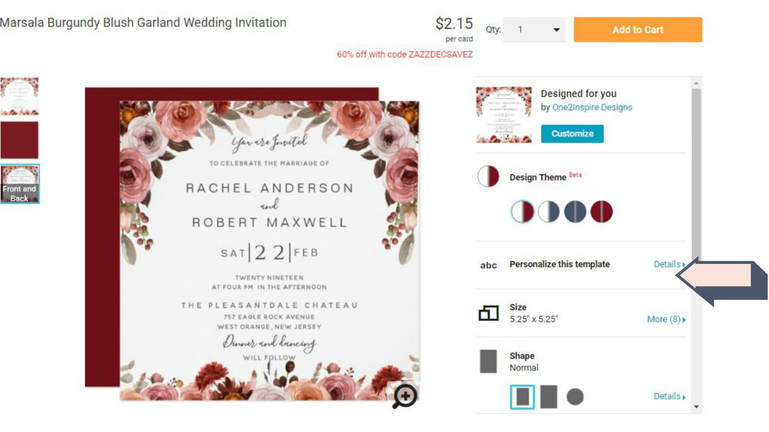
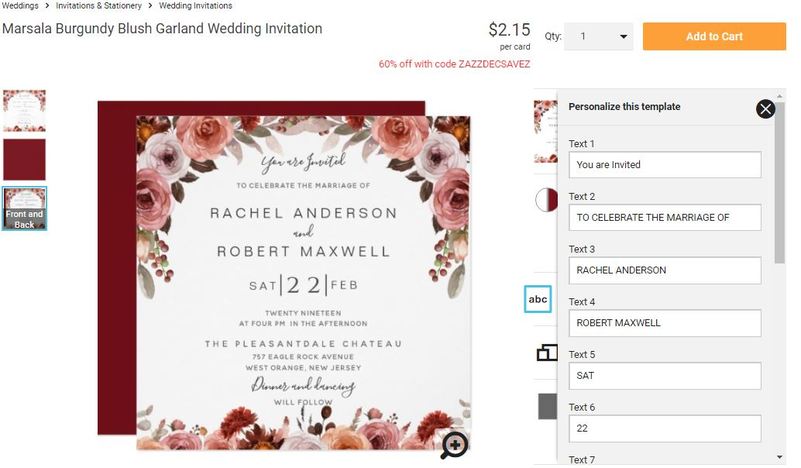
Simply click on "personalize this template" (see image "A" below) and then fill the text boxes with your own information (see Image "B"). Your information will populate automatically the product in the correct area and you will be able to see the changes taking place in front of you...is that easy!
Simply click on "personalize this template" (see image "A" below) and then fill the text boxes with your own information (see Image "B"). Your information will populate automatically the product in the correct area and you will be able to see the changes taking place in front of you...is that easy!
IMAGE "A"
IMAGE "B"
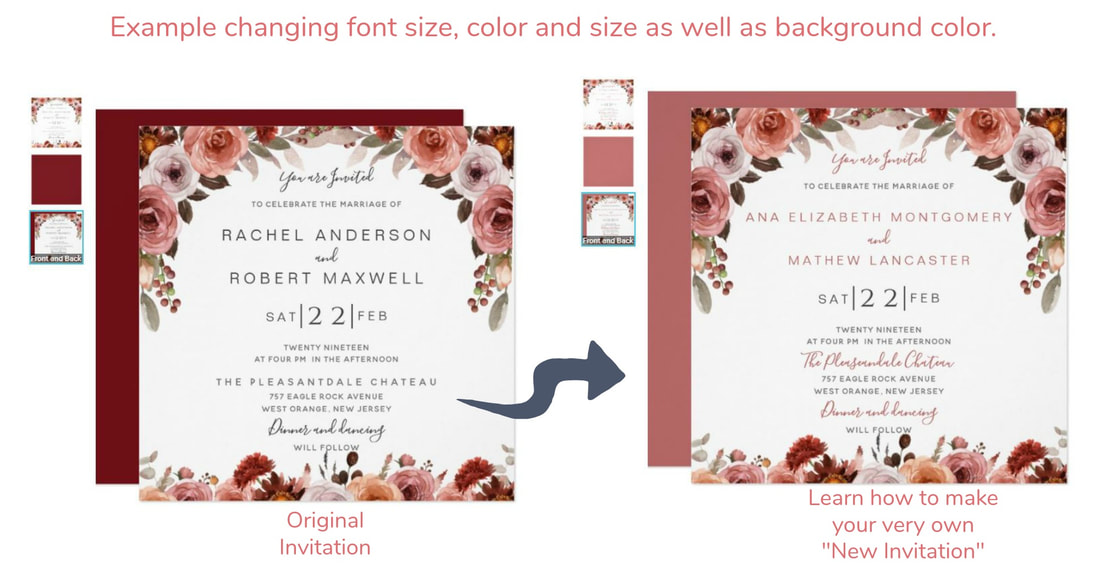
But what about doing other changes and adjustments? like changing font's size, color or style, deleting sections and adding others, or even changing the background color to match your event color palette? YES!, You can make all these changes following a few easy steps!
After making changes you can always preview the product as it will look from all angles, and only once you are 100% satisfied, and if you wish, you may proceed to place an order directly online. Absolutely no question and no strings attached, you don't even need to provide any information at all!
LEARN HOW TO MAKE ALL THESE CHANGES IN A BREEZE by FOLLOWING JUST A FEW easy STEPS!
Learn with our guide: a) how to change font size, color or style, b) how to make background color changes (i.e. change a burgundy invitation into a blush pink invitation), and c) delete, move around or add text and images.
Let's begin with...
a) how to make font size, color or style changes
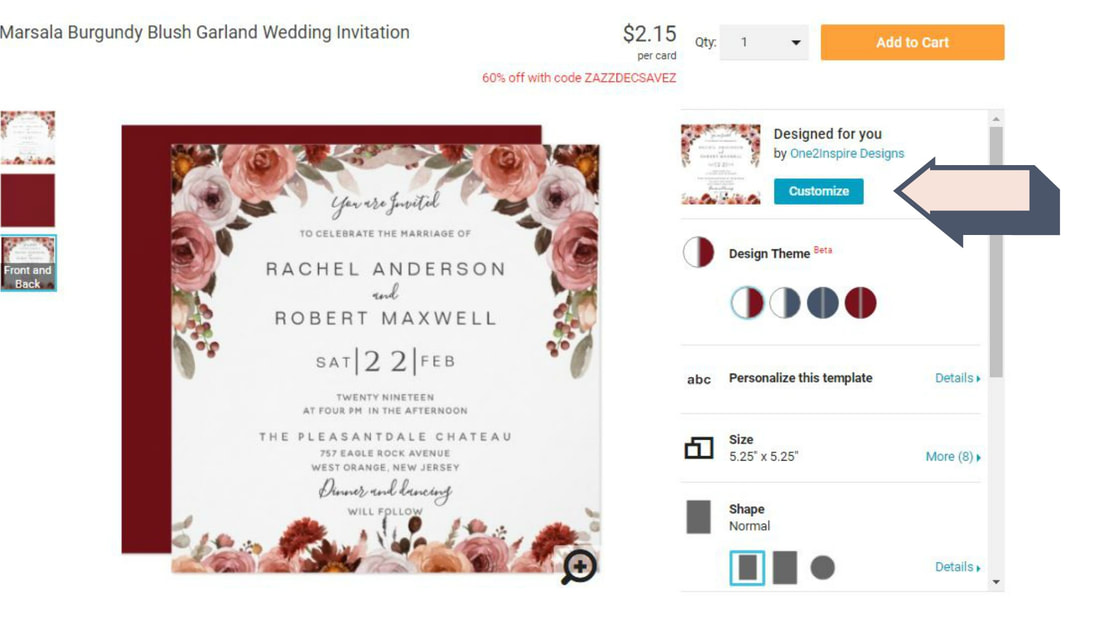
To make changes in font's size, color or style simply click on the blue"Customize" button,see image below. (you could also select "customize further" found at the bottom of text boxes inside "personalize this template" )
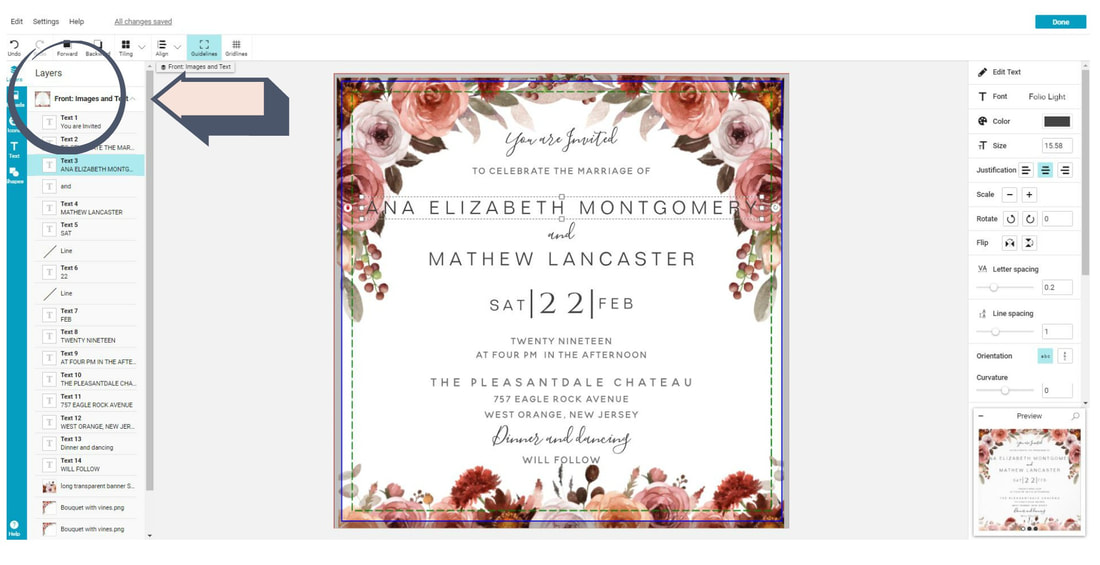
Once you select "Customize" or "Customize Further" a window with the editing menu will appear (see image below). Most products have a "front" and "back" sections. Normally by default the "Front: images and text" menu will appear first.
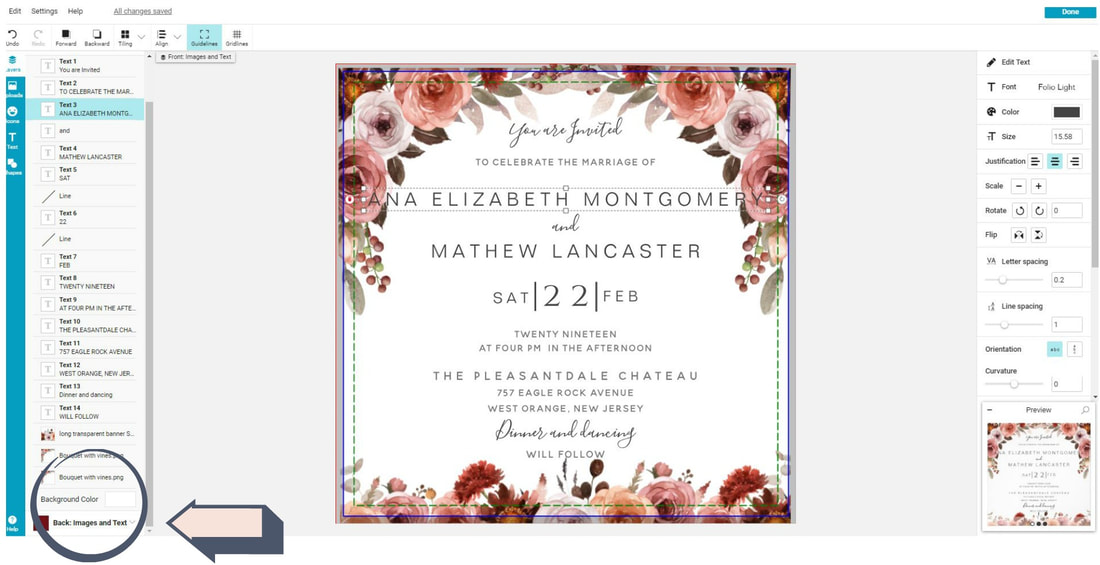
If the change you wish to make is in the "Back" of the product, simply scroll down the menu on the left, and below all front's layers, you can find the "Back: images and text" option (see circled area on image below). Select it, and it will bring you to the "back" editing menu.
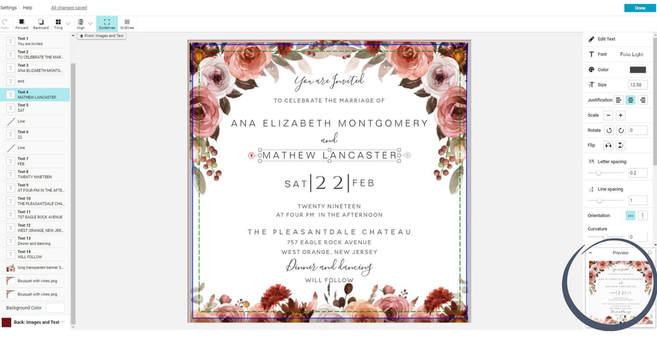
For this example let's imagine you have a long name and it doesn't fit correctly on the invitation. Simply select from menu on left the text section with your name (see arrow "step 1" on image below) .
Once you select the text you wish to change, its editing menu will be set on the right side (see arrow "step 2" on image below). From this right side menu you can make all the changes you want,... is as simple as that!
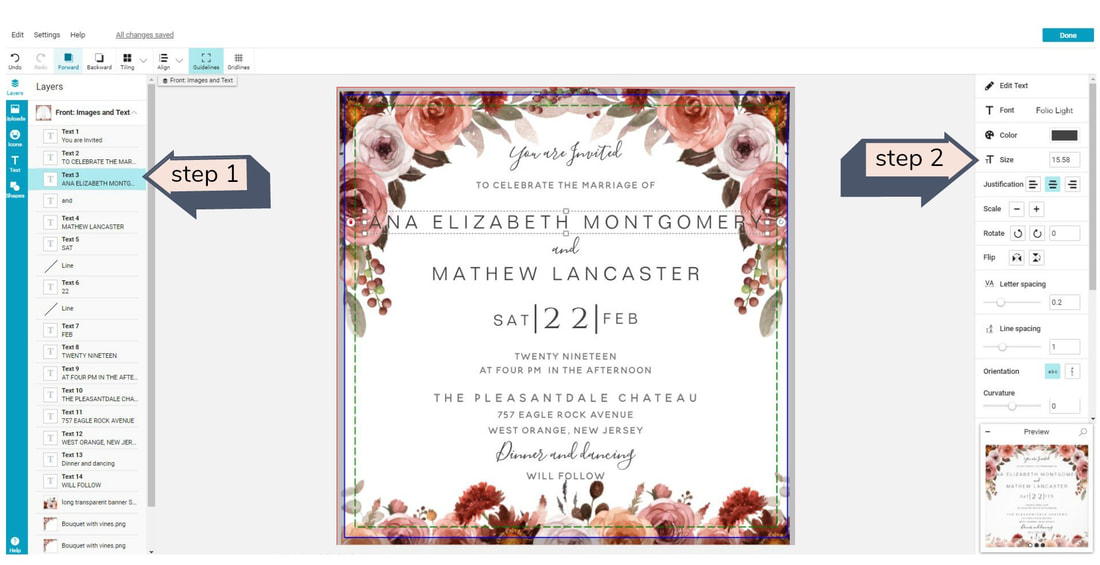
WITH THIS TWO SIMPLE STEPS YOU CAN:
- "Edit" text write down a different text, or change caps and small caps on text.
- Change text "Fonts" and choose from our huge font menu, try as many fonts as you like until you love the results!
- Change text "Color", choose from a variety of colors on our color menu or even write down your own hex color code (great for when you like to match your event color palette).
- Change the Size smaller or bigger by clicking on the up or down arrows that appear when your select size.
- Justify the text, centered, to the right or to the left.
- Scale up or down your text.
- Change the letter spacing (see in image above text is at 0.2 spacing) you may reduce or increase it as you need.
- And even reduce or increase line spacing or change the orientation or curvature of your text!
One important note, every time you make changes in font size, style or color make sure the product as a "whole" still looks correctly. As in the example above, if the bride's name is changed to a smaller size to fit correctly, the groom's name should be changed as well otherwise the invitation would look unbalanced.
Keep playing with the editing menu on the right until you love the results. And visit the "Preview" images often to see your product on big scale and from all angles.
Keep playing with the editing menu on the right until you love the results. And visit the "Preview" images often to see your product on big scale and from all angles.
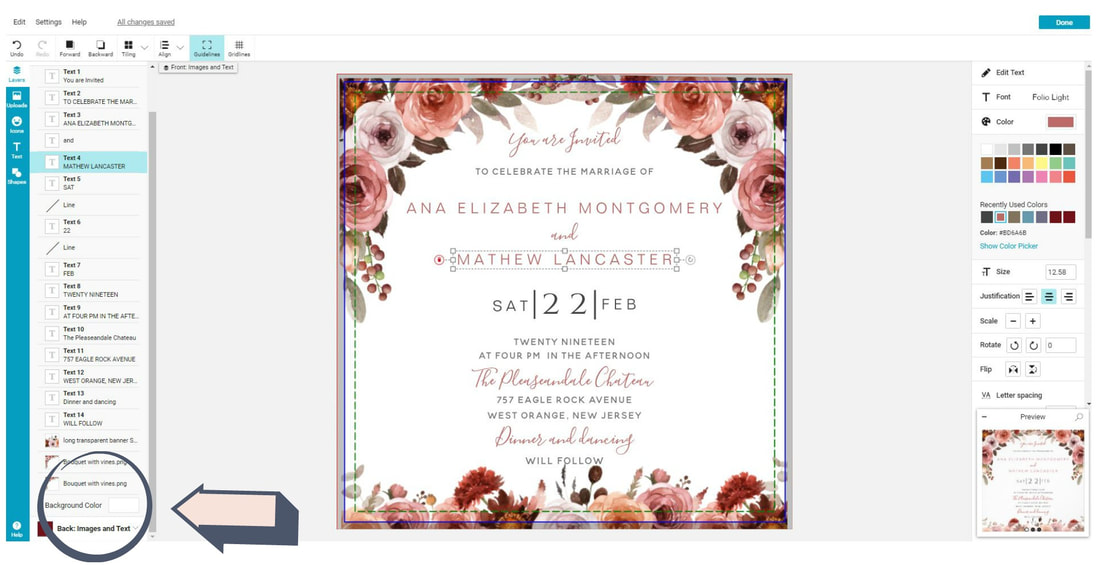
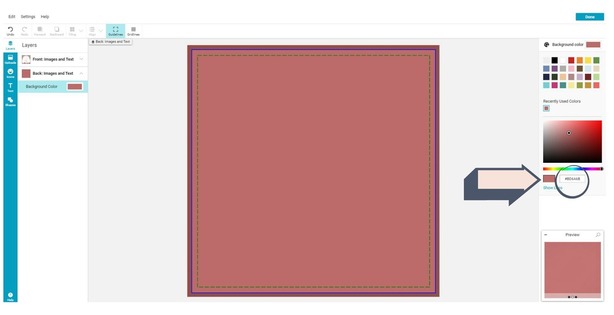
As we said before, a great feature is that you can always match a color from your event color palette. For example, Let's imagine you searched in the internet for blush pink hex colors, and found a very similar code to the color on your bridesmaid's dresses, (code# bd6a6b), great!. On the "Color" menu, you can click on "Show Color Picker" and write down your the hex color code on the text box provided (see image below).
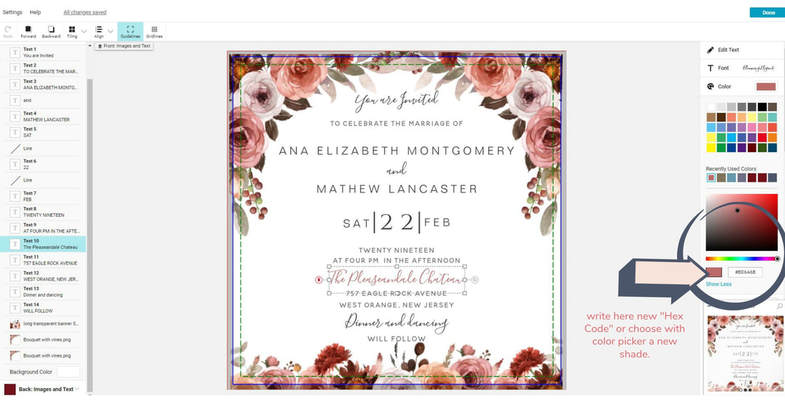
Add easily any hex color code to match your event color palette!
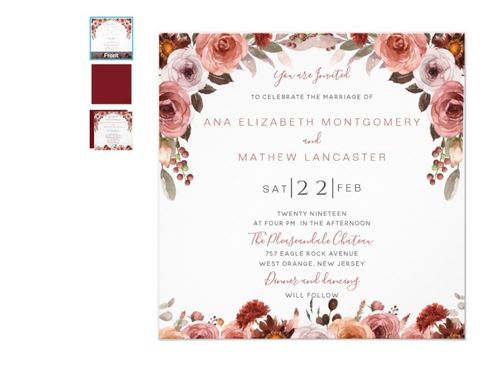
Important note: if you are thinking on getting other coordinating event products and changing their color as well, please make sure you write down the hex color code you chose, and keep it in a safe place. This way you can pick the exact same color in the other products for a perfect match.
b) how to change background colors:
Changing background colors is pretty easy. On left side menu, scroll all the way down until you see the product's "Background Color" section (see image below).
The first "Background Color" refers to the products "side" (front or back) you are on at the moment. In this case we are on the invitation "front" side, with the white background behind all text and flowers. If you desire to make changes to this background simply select it, and it's color menu will appear on the right side.
At the beginning of this guide we explained how in order to make any changes on the back side of the product, you must first select "Back: Images and Text" on the bottom of the menu.
For this example we are going to change the background color on the "back" of the invitation, so we first selected "Back: Images and Text", at the very end of the menu. This allow us to get access to all the backside layers including it's background color. (see image above)
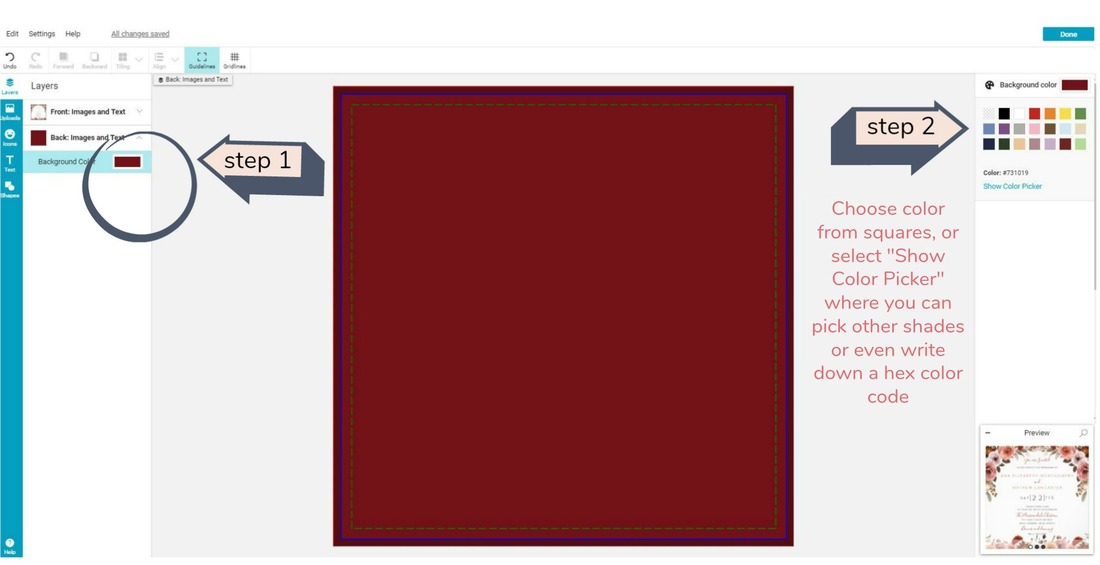
Now that we are on the backside, we can select "Background Color" (see image below step 1). This will bring up the backside color menu (see image below step 2) Choose from the square colors provided, or select "Show Color Picker" where you are able to write an exact hex color.
Now that we are on the backside, we can select "Background Color" (see image below step 1). This will bring up the backside color menu (see image below step 2) Choose from the square colors provided, or select "Show Color Picker" where you are able to write an exact hex color.
Now its time to click on the "Preview Images" and see if you like the end results (see image below). Make sure all sections are as you like. You can still go back and make as many changes as you want. Once you are finished, click on the right side top blue button "Done", and only once you are completely happy with the end results, if you wish, you can place an order and add the product into your cart.
C) LASTLY, LEARN HOW TO DELETE, MOVE OR ADD IMAGES AND TEXT
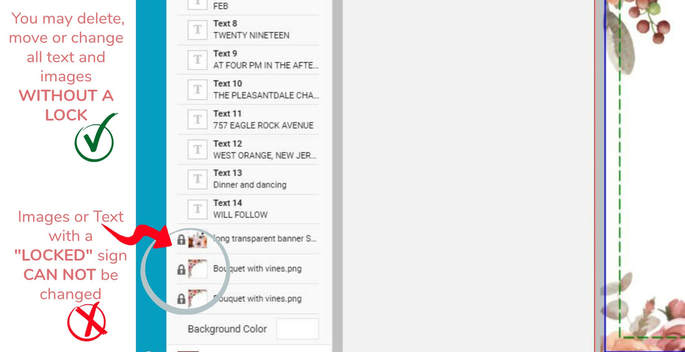
You can also delete or move around any text or images from our products, as long as they do NOThave a "locked" sign (see image below).
To delete select as before the image or text to delete and click on "backspace" on your keyboard, or go to "Edit" (first on top left menu) and click on "delete". To move around a text or an image, "grab" from screen with your cursor and move to the area you wish.
To delete select as before the image or text to delete and click on "backspace" on your keyboard, or go to "Edit" (first on top left menu) and click on "delete". To move around a text or an image, "grab" from screen with your cursor and move to the area you wish.
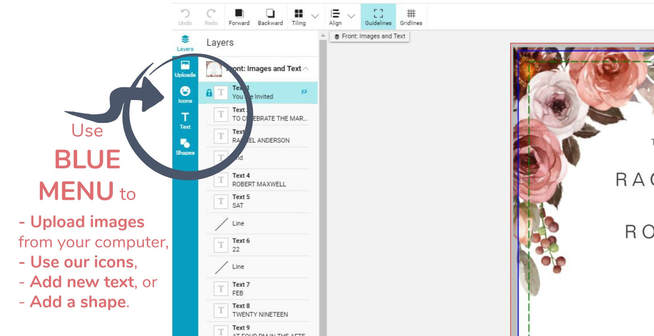
Finally to add text and images we are going to use the "Blue Menu" on the left side (see image below).
You can upload any image from your computer, use our icons (program already includes all sort of images you can use), add a new text or add a shape. Play with these options and feel free to make your own creation!
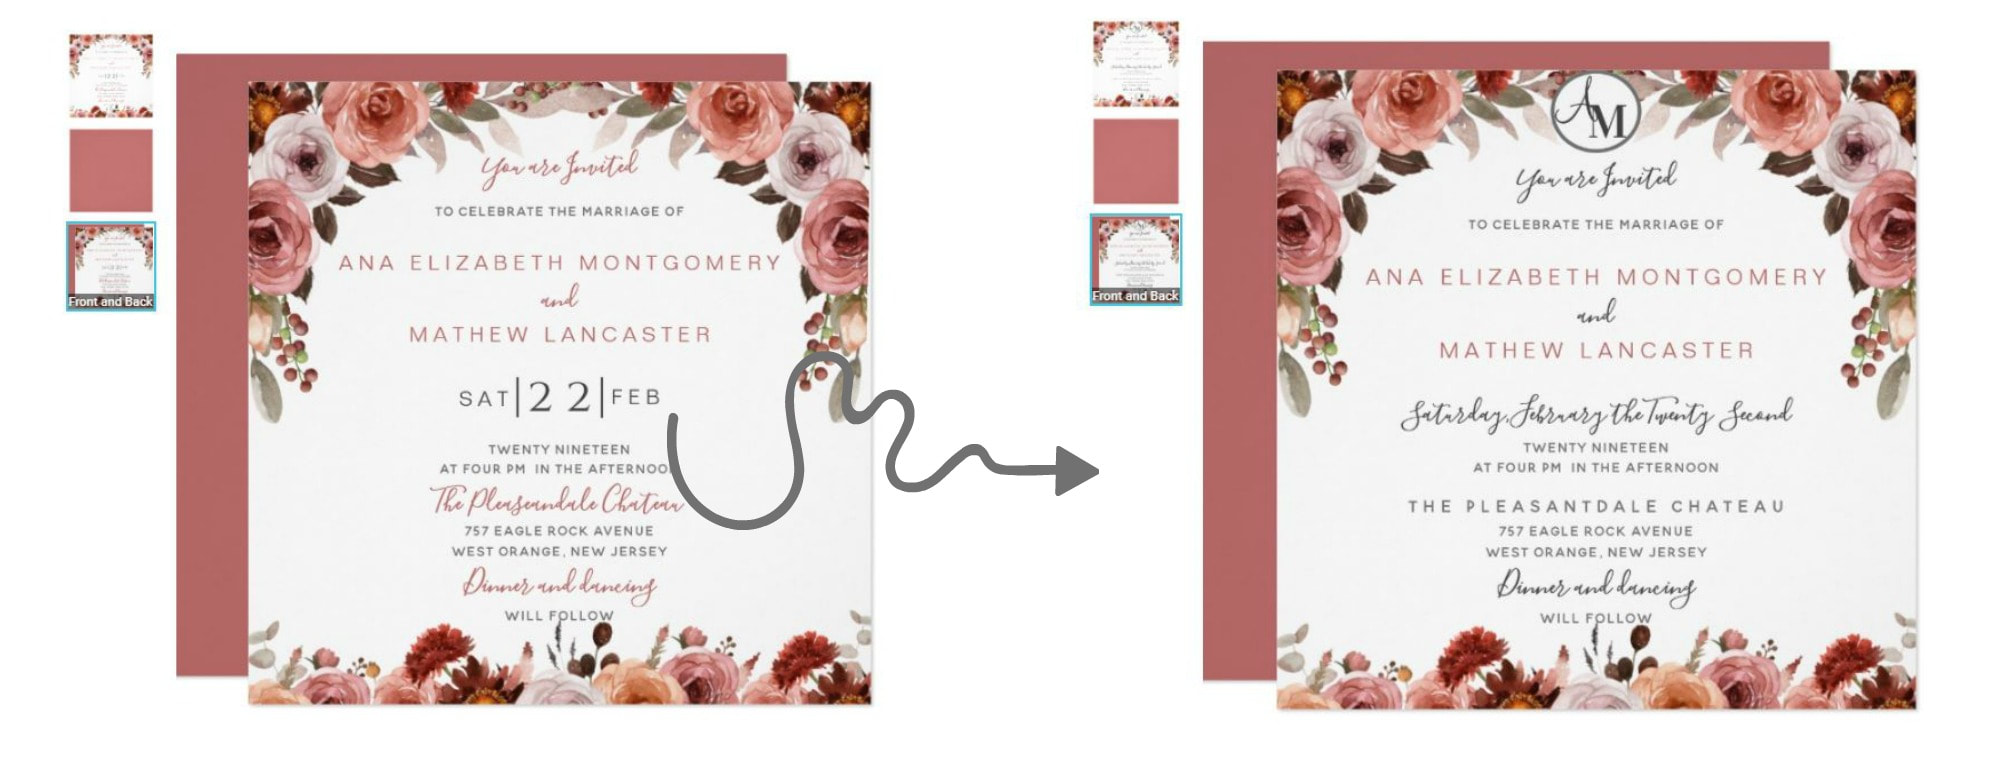
See our image below with an example on how a few quick easy changes can bring a whole new life to a product.
See our image below with an example on how a few quick easy changes can bring a whole new life to a product.
Changes we did above:
- Deleted the date section as it is taking a big space
- Created a new date text in a long script style with matching text font we had in other areas.
- Move five top text sections a bit down now that we had some free space.
- Changed some text lines to dark gray color.
- Added a circle (from shapes blue menu) to the top area.
- Added Bride's and Groom's text initials each using a different font, a feminine font for the bride and a masculine font for the groom.
Once you try it you will find all changes are easy to do. There is really no way wrong and at any moment you can click "Undo" on the top left menu and remove the changed you did. So really there is nothing to fear!

You have finished our guide and now you are all set to create any changes and adjustments you need, have fun and enjoy the process!
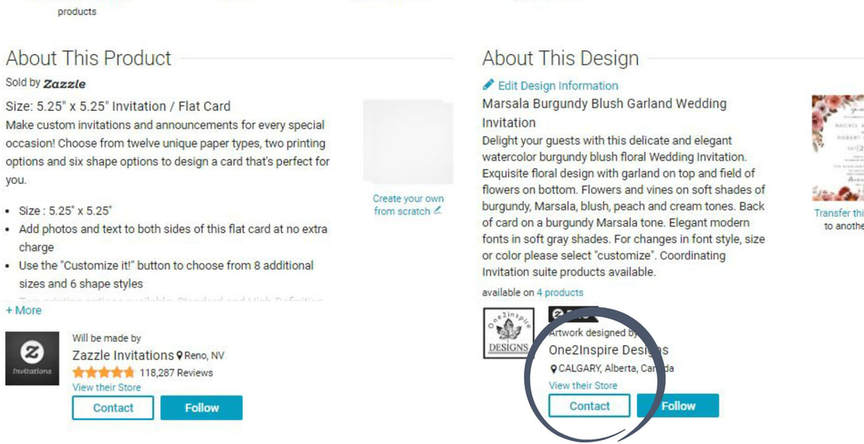
Please know that at any moment if you need our assistance, you can always send us a few lines and we would be happy to help you out. The best way to do it would be directly from the product page on our store (see image below) . Our "Contact Button" is on the right side below all our products. Once you click on it, you will be able to send us a message and it would let us know the exact product your question is about, making it easy for us to help you and answer you back.
We hope you found our guide of service, and wish you happy creations!
On behalf of everyone at One2inspire Designs, we thank you for letting us be part of your special events and occasions. We feel honored and inspired, always striving to provide you with the utmost top quality designs.
On behalf of everyone at One2inspire Designs, we thank you for letting us be part of your special events and occasions. We feel honored and inspired, always striving to provide you with the utmost top quality designs.

